Polski Związek Krótkofalowców |
|
Polski Klub Radiovideografii |

|
Navigation: Program HAM SECRETARY and its purpose > Prints QSL cards, labels, envelopes and bookmarks > Prints and previews for real data |


|
| Expand all elements Callapse all elements |
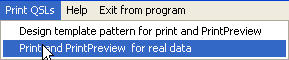
Described in this section can be regarded as acts chapter Quick start a program, because you do not have to start from the first design for print form, because nearly all forms submitted for print can be used by each station. Same of the fields contained in them is taken from the personal data entered in the station when you first start the program. To do this function you must select from the main menu function Print an PrintPreview for real data.
or from the printer icon
Next step notify us two screens
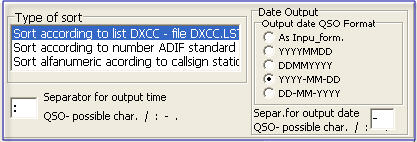
In order to fill page must first select how will be sorted printout and format date output
It is possible to sort print by:
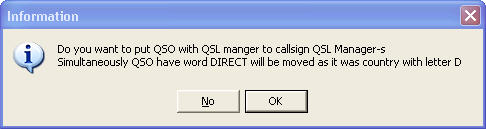
In 1 and 2 - point moving the QSL card to go through the QSL Manager will be do automatically without asking the user for this option
Date format output has the following possible values:
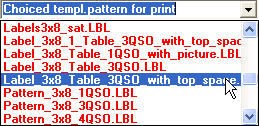
It should be emphasized here that the function print have their own sort and do not need to use the sorting function described in the section Preparing files for printing with use mail merge methodology and described in this sub-chapter Sort according to list DXCC or Sort according to number ADIF or Sort by callsign station. Then from the menu Choiced template pattern for print choice interesting pattern
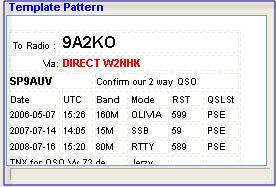
Appear to us pattern template in the form
Downloading data QSO 's from group files The program HAM_SECRETARY provides chance to retrieve data for QSO's not just from one but also from many files type. adi. Created this opportunity especially for users of the program MixW - which unfortunately does not have such posibillity as select QSO flag for shipping (as Logger32) or insert into the field QSL_Sent any letters for example R - Requested or Q -Queue , as for example can do that Ham Radio de Luxe. In MixW field QSL_Send can only be set to true or false . Because I prefer to take the decision immediately after the QSO is only after completion of QSOs produce a file type .adi even with one QSO and select in a MixW that the QSL has been sent. In this way we create several files of type. adi, which must then join it and print data . Unfortunately MixW can not select the directory where you created the collection in the format. adi, and it only creates its in a own root directory. Therefore, these files should be put there temporarily and then create mechanism to merge all these files into one and save to a directory and delete those partial from the root directory . For this purpose we choose
List window of group to get the data, eg MixW yet empty, will be completed as soon as we will see later show Then press the Choice a source file with QSO for print
We will report this window
A window with List of files to get data appears for download 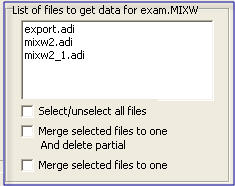 Window with list of files to get data  Select all files and merge If we want to select not all files press also key CTRL or SHIFT. After selecting Merge selected files to on and delete partial files appear window to save the file containing data from all sub-sets selected. First, create a new subdirectory:
In the new window serve name of the joined file of example. join ( (extension. adi will be added automatically). Appears:
After saving the joined file it becomes the basis for print QSL cards or labels, the Program has not already asked for his name again and go to the point. Then press Choice source file with data for print
Appear to us window with the choice of the directory and a file of source data format. csv file. adi. ADIF. txt (while all of these formats together to choose)
Appear to us window with request inclusion of the input date format. The proposed format is adopted as the standard for ADIF ie YYYYMMDD
In the event that does not fit the format YYYYMMDD for the date QSOs taken from the 1st of the QSO data record should be changed. There possible values are:
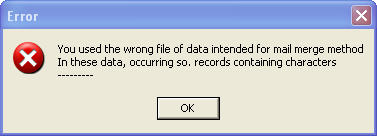
It should be emphasized here again that the function print have their own sort and do not need to use the sorting function described in the section Preparing files for printing with use mail merge methodology and described in this sub-chapter Sort according to list DXCC or Sort according to number ADIF or Sort by callsign station. Not even allowed to use these files as if they are for example for 3 QSO card , then in the sorted file is inserting records containing this empty record with characters "----------" instead of the what has been described above. If the user selects this file on screen will be display message
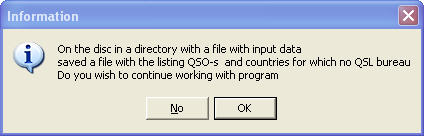
In connection with the introduction of the new function - verifying for each QSO - country the presence of offices QSL bureau , you may receive the following message
This message means that the data file with data of QSO exist QSO for which countries do not possess the QSL bureau. These countries are saved in the folder where to downloaded the data input and has a name Report_QSO_country_without_QSL_bureau.txt. Possible actions we can take you here are the following main :
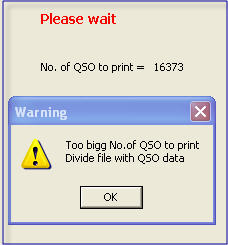
In the current version v 3.0.0 the next screen was changed and displays so that there is no longer displayed the completed form QSL - and there's a string Please wait - which greatly accelerated the work program. At the end you will simply be filled the form of last QSL-s. If we have to print a very large number of QSOs such as here 16373 and we chose print all the QSL may obtain a message to shorten the file of data to print
Rules of the permissible amount for printing QSO is as follows :
Once approved OK program will return to the main menu.
Next appears to us full data of the page with Report of the print. This report is also stored in the text file Report.txt in the directory where you downloaded the data input. Also in this directory is stored a file Country.CSV underlying print bookmarks between countries in a package sent to the QSL-bureau
In order to print page, go to the next item on the print data together with a preview page to print. If you send any cards direct go to the download section addresses from QRZ.com |


Previewing print data and print directly to make when you choose Bookmarks Print Preview and Printing
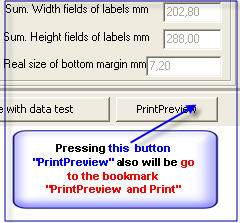
You can also go to this point from bookmark Design template pattern for print by pressing Print Preview button to obtain o preview and print test data from the test file of QSO ..
Then the screen will appear with the possibility of moving the paper along the height and width
Clicking the left mouse button on the page to print will increase the default magnification. Click again to return to the previous magnification. Print pages to print can be made using two selection options print :
In the right side appears box - Additional move printing page - which can be made along the height of the page (for QSL cards printed in landscape orientation - this is a dimension of 90 mm) and along the width (for QSL cards printed in landscape orientation - it is a dimension of 140 mm). The size shift can be either as plus value or minus value . For print options = program itself selects the page size - this value can be quite large values of -20 (minus 20) -40, This large value shall grant applies proper moving if printer have various limiter for puts paper in the right printer . Width for this limiter is not account by the printer driver . Sou program must moving printing page for this wide of right limiters. This option is especially useful if the new part of QSL's cards have a little smaller dimension than previous part - for example 2 mm, more or less, and we want to hit print in the field
Starting from version 3.2.2, in the screen bookmarks Print Preview and Printing appears line - - - - - - in red color , showing the boundaries of the area in which you can move the print. This border is drawn on the basis of minimal margins which requires a printer (note! - this is margins what what is not set by the user - which may be higher). Practically, it looks like the screenshot below.
Descriptions of the image alone explain what actions make. Only some of them need to discuss:
|


Print envelopes and mailing envelopes feedback SASE is similar to that described above chapter and consists of:
In order to print go to the point of print data together with a preview page to print |


|
Navigation: Program HAM SECRETARY and its purpose > Prints QSL cards, labels, envelopes and bookmarks > Prints and previews for real data |
|
| Expand all elements Collapse all elements |